ACORN ATOM EMULATOR v1.32
Welcome to the Acorn ATOM software emulator for PC's.
NL versie Wouter Ras ©, Delft, Oct 1997 - May 1998 This program enables you to run most of the original Acorn ATOM software on your PC.
Minimum requirements:
-80286 CPU (80486 DX-40 required for real time emulation)
-VGA display
-410 kB RAM conventional memory
-MS-DOS 3.0
The full emulation pack contains the following files:
-Atom.Exe - Acorn ATOM software emulator (286+)
-AtomCom.Exe - Utility to transfer file from and to tape or original Atom
-AtomTape.Exe - Utility to read ATOM tapes into PC-memory
-ReadMe.1st - Latest information
-ExtROM.Tap - A tape image containing extension boxes
-*.Doc - Several documentation file
The emulator has been tested on several computers and turned out to work on
every one of them. The program is designed to run under an MS-DOS environ-
ment. It also works with Windows 3.1 and Windows 95, however, the full
screen mode is required. Timing, synchronisation and sound are better if run
in native MS-DOS mode than under Windows.
2. CONFIGURATION
The emulator can be configured to your own satisfaction. The preferences may
be saved in the ATOM.INI file. If there's no .INI-file at startup, the
emulator uses default values (between brackets). The parameters marked with
an asterisk (*) can be edited also from within the emulator desktop (see
chapters 4.2 and 4.3).
*ASMLayout : The assembly listings in the built-in monitor can be
(0) displayed in two different ways, either using the ATOM
notation (@ for immediate, # for hexadecimal numbers) or the
regular notation (# for immediate, $ for hexadecimal numbers).
*Sound : You can select whether or not you wish to have sound effects
(1) outputted to the PC-speaker or through the SoundBlaster.
Detection of a SoundBlaster is done automatically.
-SpeedIndex : If you can't get the emulator to run at the right speed, you
(auto) might want to specify a number here which sets emulation at a
certain speed. The higher this number, the slower the
emulation. For 486/Pentium machines this value should be
about the speed of your CPU in MHz. On somewhat slower
systems (eg. 486-40 MHz) the value of SpeedIndex must be a
bit lower then the CPU speed.
-ExtROMFile : The emulator is equipped with the AXR1 chip (see chapter 5.1)
(EXTROM.TAP) in the memory range A000h-AFFFh as a standard. If you would
like to use other (EP)ROMs (boxes) at this address, you can
specify a name of the file containing one or more boxes
designed for this address-range. See chapters 4.2 and 6.1 for
information on this fileformat. Up to 16 different boxes can
be used at a time. If no filename is specified here, the
emulator will load from the file EXTROM.TAP (if it exists).
-Use80x87 : The emulator now also supports the new Floating Point ROM at
(0) D000h by Leendert Bijnagte. This rom links to 80x87
co-processor routines for super fast calculations. At least,
an 80387 is required. If an older or no co-processor is
present, this option should be set to 0.
-IgnoreZpFEh : Before sending a character to the printer, the ATOM compares
(1) it to the contents of zero page address FEh. If they are the
same, the character is not sent to the printer. On BREAK, this
value is set to 0Ah (LF), which for most printers means that
all text is printed at the same spot.
If this parameter in the .INI file is set to 1, the comparison
to zero page address FEh is ignored, because memory address
FF07h will be changed to 00h.
-BoxSwitch : If you want to use only one box at A000h (no switching), set
(1) this value to 0. The first box in the file specified in
ExtROMFile will be loaded. If no file can be found, the AXR1
will be installed. See chapter 5.3 for more information.
-Box0onBreak : If this value is set to 1, the (EP)ROM in box no.0 will be
(1) reinstalled whenever the BREAK key (F12) is pressed. If this
value is set to 0, the current (EP)ROM remains active.
-NMIResponse : This value, in the range 15 to 255, sets the reaction time
after which the processor responds, when the NMI request line
has gone low. In the ATOM, the NMI is used for transferring
data between ATOM and the disk drives. To achieve the same
transfer rate as on a real ATOM, this value must be set to
approximately 40. The default value (also minimum for proper
transfer with the standard ATOM DOS routines) is 15.
*Colors : You can set all seven colors that are used during emulation
ù BackGr is the backgroundcolor.
ù ForeGr is the foregroundcolor.
ù GreySb is the color of the "grey symbols" (C0h-FFh).
ù Color0-Color3 are the colors in HIRES color modes.
Each color is a six digit (3 bytes) hexadecimal number;
the first byte stands for the amount of RED, the second for
the amount of GREEN and the third for the amount of BLUE.
The range for each of these bytes is 00h to 3Fh.
*Drives : You can set the names of the image files, which will be opened
on startup, for each drive.
3. KEYBOARD
Due to the fact that the ATOM's keyboard layout differs form the PC's
keyboard layout, a few keys have been changed. The most important are:
-F12 : Break
-Tab : Copy
-Alt : Rept
-CapsLock : Lock
-` : ^
Furthermore the ATOM-cursorkeys have been replaced by the PC-cursorkeys.
Therefore the SHIFT keys are no longer required to move the cursor down or
left. (Note: If NumLock is on, only the arrows on the numeric keypad will
give the correct results!)
In a lot of games, however, it would be better if some keys had been placed
elsewhere or would have been swapped. This can be done by toggling between
the standard keyboard (as described above) and an alternate keyboard. When
the alternate keyboard has been selected, the following keys should be used:
-Tab : Left/right arrow
-CapsLock : Up/down arrow
-Left Shift : Ctrl
-Ctrl/Alt : Shift
-Right Shift : Rept
-Cursor Lf : Lock
-Cursor Rt : Copy
Swapping between the standard and the alternate keyboard layout is done
during emulation by pressing the [F4] key. On BREAK (F12), the standard
keyboard is selected automatically.
The following keys have a special function:
-F4 : Toggle between standard/alternate keyboard
-F5 : Toggle between original/maximum CPU speed
-F6 : Show box information
-F8 : Enter emulator desktop, disk screen
-F9 : Enter emulator desktop, tape screen
-F10 : Enter emulator desktop, options screen
-F11 : Enter emulator desktop, built-in monitor
-Shift+F12 : Temporarily go to MS-DOS
-Ctrl+F12 : Exit the emulator
-Alt+F12 : Boot from disk-image in drive 0 (MouseDos Box required)
-Print Scrn : Capture screen to .BMP file
4. EMULATOR DESKTOP
Press F8, F9, F10 or F11 during emulation to enter the emulator desktop. On
the top line four divisions of the desktop are shown. They can be selected by
pressing [Alt] and the highlighted letter simultaneously or the corresponding
hotkeys F8, F9, F10 or F11.
-Disk : Alt+D (or F8)
-Tape : Alt+T (or F9)
-Options : Alt+O (or F10)
-Monitor : Alt+M (or F11)
4.1 DISK
The Disk screen enables you to select the disk image (.DSK files). A disk
image file is recognised as such, if it is (19000h) 102,400 bytes in size.
A disk has of 40 tracks, with 10 sectors, consisting of 256 bytes, each.
On the left hand side of the screen all the disk images are shown. On a real
ATOM, with the 8271 FDC, it was possible to connect two double sided disk
drives:
+----------------+ +-----------------+
| DRIVE 0 | | DRIVE 1 |
| --------------- | | --------------- |
| DRIVE 2 | | DRIVE 3 |
+----------------+ +-----------------+
The four drive numbers are shown in the area on the right hand side of the
screen. Use the following keys:
-Press the [Cursor Up] or [Page Up] key to move the cursor up.
-Press the [Cursor Down] or [Page Down] key to move the cursor down.
-Press [Tab] and [Shift+Tab] or the [0], [1], [2] and [3] keys to select
a drive number.
-Press the [N] key to create a new disk image. You must enter a file name.
If there's no file with that name already, a new file will be created. It
is not necessary to format it.
-Press the [O] key or [Enter] to "insert" an image in the specified drive.
If the cursor is pointing to the last spot (where there's no file name),
the drive will be emptied.
-Press the [S] key to save the names of the images into the .INI file. The
next time the emulator is run, the same disk images will be opened
automatically.
-Press the [P] key to toggle the write protect attribute of the disk in
the highlighted drive.
Loading of files from a disk image is done from the ATOM itself. First, you
must enter the ATOM DOS, by typing
*DOS
Each time BREAK is pressed, this statement must be re-entered, because on a
BREAK the COS is restored. On the ATOM emulator, it is also possible to
enter the COS again by typing:
*COS
See chapter 5.1 for a list of DOS commands.
As stated above, a disk can be write protected. This is done by setting the
"ReadOnly" attribute of the disk image. If a disk is write protected, this
is shown in the disk screen of the desktop by a "#" behind the disk name.
The write protect attribute only applies to the corresponding drive (and not
to its "backside").
Another advantage that the emulator has with respect to an original ATOM is
that the emulator doesn't have the limitations of the physical layout of the
disk drives. In other words, it is possible to insert a disk in drive 0 and
to insert another disk (than the backside of that disk) in drive 2.
Whenever disk transfer takes place, an icon of the two drives is shown on
the left hand side in the lower border, with the LED of the active drive on.
4.2 TAPE
The Tape screen enables you to select the tape images (.TAP files) from
which you can load ATOM files. The screen has two separate areas; the one
on the left hand side shows the directory with all the tape images, the
area on the right hand side shows the contents of the selected tape image.
A tape image consists of a number of ATOM files (.ATM files; see chapter 6
for a description) all appended to each other. One tape image can hold up
to a maximum of 500 ATOM files.
If the cursor is in the left hand area, where the tape images are shown, the
following actions can be taken:
-Press the [Cursor Up] or [Page Up] key to move the cursor up.
-Press the [Cursor Down] or [Page Down] key to move the cursor down.
-Press the [N] key to create a new tape image. You must enter a file name.
If there's no file with that name already, a new file will be created and
its length will be set to 0.
-Press [O], [Enter] or the [Cursor Right] key to move the cursor to the
right hand side of the screen, in which the ATOM files are shown.
If the cursor is shown in the right hand area, the selected tape image can
be used and/or manipulated.The contents of the tape image are shown line by
line. Each line represents one ATOM file, from which the name is displayed
followed by three hexadecimal numbers: The first one is the program's start
address, the second number is the program's execution address and the last
number is the program's size in bytes.
The following actions can be taken:
-Press the [Cursor Up] or [Page Up] key to move the cursor up.
-Press the [Cursor Down] or [Page Down] key to move the cursor down.
-Press [S] or [Enter] to set the tape file pointer to the cursor position.
-Press [L] to load the file the cursor is pointing to and return to the
emulator. Now there are three possibilities:
ù If the program's start address is 2900h and its execution address is
C2B2h, a BASIC "LOAD" command will be issued. This means that the file
is loaded into the ATOM's text area at 2900h. Then the text area is
scanned through to set the value of TOP and the free space pointer.
Remember, if the file is not a valid BASIC program, the prompt may not
appear.
ù If the program's start address is not 2900h, but the execution address
is C2B2h, the COS command "*LOAD" will be issued. The value of TOP will
not be set.
ù In any other case the COS command "*RUN" will be issued. This will load
the file at its start address and then execution is transferred to the
execution address specified in the file. The value of TOP is not set.
Remember that all commands that are preceeded by an asterisk (*) are COS
commands and not BASIC commands, which in short means that the value op
TOP will not be set after the file has been loaded. Statements like DIM
will generate "Error 216", unless the END or OLD statement are entered
prior to RUNning the program.
If you would like to open a file using another command than the desktop
generates, or if you would like to load it at another address, it must
be typed in manually from the ATOM's BASIC prompt. If no file name is
specified (or "" with the BASIC "LOAD" command), the file at the current
cursor position will be loaded. The emulator also supports the "*" wild-
card at the end of the file name.
If you try to load a file that is not in the current tape image or if an
MS-DOS load error occurs, "ERROR 6" (the infamous checksum error) will be
generated.
It is not possible to load files from the desktop when in debug mode. This
must also be done by typing it from the ATOM basic prompt.
-Press [R] to rename the current ATOM file.
-Press [I] to import an ATOM file. In the right hand area all the importable
files in the current directory will be shown. You can select one by
pressing [Enter] and it will then be inserted in the tape image at the
current cursor position.
-Press [E] to export the current file. An MS-DOS name will generated by the
emulator. The file cannot be exported if there already is a file with the
same name.
-Press [D] to delete the current file. You will be prompted for confir-
mation.
-Press [F] to freeze the current state of the emulator.
-Press [T] or the [Cursor Left] key to move the cursor back to left hand
side of the screen, in which the tape images are shown.
4.3 OPTIONS
The Options screen allows you to change the emulator settings and to save
them to the .INI-file. The changeable settings are:
-CPU speed : The emulator can run at two speeds, namely
ù Original : The emulator will try to be as close as possible
to the original 65C02 operating speed of 1 MHz.
ù Maximum : The emulator will run at maximum speed.
You can also press [F5] during emulation to toggle between
these two CPU speed modes. On BREAK the CPU speed is reset to
original.
-ASM layout
-Colors
-Sound Outp
-Illeg Opc
-CPU type
See chapter 2 for more information.
Go to "Save options" and press [Enter] to save the preferences to the .INI
file. The previous .INI-file will be overwritten.
4.4 MONITOR
The built-in monitor lets you watch the programs when running. In the
monitor screen the following things are shown:
-65C02 registers (top right)
-Assembly code (top left)
-Memory dump (bottom)
-Active breakpoints (middle right)
Move around with cursor keys, move faster with Page Up, Page Down keys.
The actions available are:
-Trace : Executes one instruction and moves the assembly code display.
Screen updates are not turned off, so sometimes you might see
a pixel or two appearing between the monitor-information.
-Step : Steps over the instruction, skipping the assembly code display
of subroutines (JSR). In case of a subroutine, it is executed
in debug mode. You can interrupt debug mode by pressing [F1],
[F9], [F10] or [F11].
-Here : Runs emulation in debug mode until CPU reaches the instruction at
the position of the codedisplay or the [F1], [F9], [F10] or [F11]
key is pressed.
-BrkPnt : A new window is shown. Up to four breakpoints can be set at one
time. Press the [A] key to add a breakpoint (the position of the
codedisplay). Press the keys [1] to [4] to remove existing
breakpoints. All active breakpoints are shown on the right hand
side of the monitor-screen, and they remain active until they
are removed as described here.
-Goto : Prompts for a new address and jumps to it.
-Where : Moves the assembly code display to the position of the Program
Counter (PC), where the emulation was interrupted.
-Mode : Switches focus between code and dump.
The dump-values of various I/O-ports sometimes do not reflect their actual
value.
5. ATOM MEMORY
5.1 ROM
The emulated Acorn ATOM has 20 kB of Read Only Memory:
-Assembler and Casette Operating System (COS) at F000h (4 kB)
-Disk Operation System (DOS) at E000h (4 kB)
-Extension ROM (Floating Point) at D000h (4 kB)
-Basic interpreter at C000h (4 kB)
-Up to sixteen (EP)ROM boxes at A000h (4 kB per box)
All the basic ATOM functions are supported, as well as floating point
operations. The casette load & save routines have been replaced by fast
ROM-trapped routines. However, the ATOM ROM has not been changed.
The casette *CAT command has been ROM-trapped. It shows the index of a
.TAP file on the ATOM screen. Examples:
*CAT
displays all the files in the current tape image. Note, that on the first
line the name of the tape image is displayed. And
*CAT "P*" or
*CAT P* or
*CAT P
displays all files in the current tape image, starting with the letter P.
The FIN, FOUT, GET, BGET and FGET functions and the SGET, PUT, BPUT, FPUT
and SPUT statements for COS have been implemented as well, although their
operation is a little bit different from a real ATOM:
-A file can be opened for input, using the FIN function. Unlike the real
ATOM COS, a filename can be specified. The * wilcard is allowed. It is
even possible to use a variable (e.g. F=FIN S or F=FIN $S)!
If no filename is given, the file that the cursor is pointing to will be
assigned. The file will be completely loaded into a buffer. On every
subsequent GET, BGET, FGET or SGET data will be transmitted from that
buffer to the emulator. If no file has been selected using FIN, or if past
the end of the file, BGET will return ASCII code 13 (0Dh); GET and FGET
will return four resp. five codes 13 (0Dh) and SGET will return an empty
string.
-A file can be created, using the FOUT function. Unlike the real ATOM COS, a
filename can be specified. It is even possible to use a variable (e.g.
F=FOUT S or F=FOUT $S)!
If no filename is given, it will be called FILE. The file will be created
at the end of the current .TAP image. Subsequent PUT, BPUT, FPUT or SPUT
statements write data into a buffer. Each time the buffer is full, the
BREAK key (F12) is pressed, the desktop tape screen is entered or the
emulator is exited, the contents of the buffer will be appended to the
.TAP image. If for whatever reason the buffer cannot be written to the
.TAP image, a short sound will be produced, meaning that the data in the
buffer is lost.
Since the SHUT statement is ignored in COS a file remains open until a
buffer-error occurs, the BREAK key (F12) is pressed or the next output file
is created. Every time the buffer is appended, however, the name of the
last file in the image is compared to the name used when creating the file.
If they do not match, data will be lost. The name of the tape image is
checked as well. It is therefore advised not to change tape images while
PUTting data to tape.
-In DOS, the handling of random files is done exactly as on a real ATOM.
Please see later on in this chapter for information on the DOS-commands.
Up to sixteen (EP)ROM boxes at A000h can be used at the same time (See also
chapter 2). If none are available, the AXR1 will be installed automatically.
See also chapter 5.3
The AXR1 is an EPROM developed by Jos Horsmeier and Huibert Lincklaen Arriens
from Stichting Electronica Workshop (ECD/SEW), Delft in 1981 and provides the
ATOM with nineteen extra commands. Because it is not a standard Acorn ROM,
the extra commands are briefly described below:
Command Abbr. Description
------- ----- -----------------------------------------------------------
DATA DA. A sequential one line file marker
Syntax: [<ARGUMENT0> ... <ARGUMENTn>]
RESTORE RES. Resets the file pointer to a specified DATA line
Syntax: [<LINENUMBER>|<EXPRESSION>|<LABEL>]
READ REA. Get records from a DATA line
Syntax: <VARIABLE0>[,<VARIABLE1> ... <VARIABLEn>]
FIND - Locates specified strings in a BASIC program
Syntax: <LITTERAL STRING>|<STRING VARIABLE>
RENUM REN. Renumbers a BASIC program and adjusts GOTO's etc.
Syntax: [<START LINE>,<INCREMENT>]
FCOS FC. Fast 1200 bps COS with visible tape transfer indication
SCOS SC. Same as FCOS, but with 300 bps
XDUMP X. Gives ASCII/hexadecimal memory dumps
Syntax: <START ADDRESS>[,<END ADDRESS>]
HDUMP H. Gives hexadecimal memory dumps
Syntax: <START ADDRESS>[,<END ADDRESS>]
DISAS DI. A fast 6502 machine code disassembler
Syntax: <START ADDRESS>[,<END ADDRESS>]
COPY COP. Copies memory blocks to a specified destination
Syntax: <START ADDRESS>,<END ADDRESS>,<DESTINATION ADDRESS>
RELOC REL. Relocates 6502 machine code to a specified destination
Syntax: <START ADDRESS>,<END ADDRESS>,<DESTINATION ADDRESS>
STEP STE. A versatile 6502 machine code debugger
Syntax: <START ADDRESS>[,<DISPLAY ADDRESS>]
PLAY PL. Provides a versatile method of sound output
Syntax: <NOTE0>[,<NOTE1> ... <NOTEn>]
KEY K. Performs a single keyboard scan
Syntax: <VARIABLE>
ON ERR O. Redefines error handling
Syntax: <BASIC STATEMENT>
SHAPE SHA. Draws anything you want on the screen in any mode
GRMOD GR. Allows HIRES graphics to be mixed with normal characters
TXMOD T. Disables GRMOD and returns control to the 6847
FCOS and SCOS should not be used in the emulator, because the tape load and
save routines are ROM-trapped. Most of the AXR1 commands cannot be traced
with the STEP command because STEP and the traced AXR1 commands may both
use the same zero page locations. From within the built-in monitor
(see chapter 4.4), however, everything can be stepped through.
All the AXR1 commands are shown in the AXR1 demo-tape, which can be loaded
and run in the emulator.
From emulator version 1.31 onwards, the ATOM DOS routines are supported also.
Since most people did not have a DOS on their real ATOM, a description of the
available DOS commands is listed below:
Direct DOS commands are those entered by the user, and are concerned with the
transfer of program and data files as a whole. Each is preceeded by '*',
which enters the DOS command line interpreter, and it can be abbreviated by
entering enough characters to distinguish the command from others, followed
by '.'. Filenames of up to seven characters are allowed. Where a name or
other string parameter contains no spaces or " quotes, it may be entered
directly. Otherwise it must be contained by " quotes, with every " in the
name typed as "".
DOS commands:
*DOS (*D.)
Enters the Disk Operation System. The COS is re-entered on BREAK. Note:
In the ATOM emulator the COS can also be re-entered by typing *COS.
*DRIVE <drive number> (*DR.)
Selects drive number without reading the catalogue.
*CAT [drive number] (*.)
Displays the catalogue. The first line shows the title of the disk and
the current qualifier. The filenames are displayed arranged by qualifier,
with the '#' indicating that the file is locked.
The catalogue is read off disk unless the disk is in the 'ready'
condition (still spinning), in which case it is transferred from the
catalogue buffer (at 2000h).
*DIR [drive number] (*D.)
Reads the catalogue from disk to the buffer, but does not display it.
This command is often used to wait for completion of a previous
operation, since the prompt may re-appear while a transfer continues
under interrupt.
*TITLE <title> (*T.)
Sets the title of the disk to the first 13 characters of <title>.
*SETx
Sets the qualifier for all subsequent operations on files to x.
Operations that use the existing files will only search among those
created under the qualifier currently set. The default qualifier is
space. When returning to the default qualifier, be sure to enter space
after the set command.
*USEx
Temporarily sets the qualifier to x. The system returns to the previous
qualifier after the next successful operation. Two successive USE
commands are equivalent to a SET.
*LOCK <name>
Locks the named file. Locked files cannot be deleted or updated.
*UNLOCK <name> (*U.)
Unlocks the named file.
*INFO <name> (*I.)
Displays information about the named file. The format is:
qualifier : lockstate filename loadaddr execaddr length startsector
For example:
s: #BASIC C000 C2B2 01000 002
The '#' indicates that the file is locked.
*MON (*M.)
Turns on messages. Subsequent file operations print out the file's
information in the format of *INFO.
*NOMON (*N.)
Turns off messages.
*SAVE <name> aaaa bbbb cccc (*S.)
Creates a file. The contents of memory from aaaa to bbbb-1 are saved as
the named file. If a file with the same name already exists under the
current qualifier, it is deleted. The address cccc is an optional
execution address and it defaults to aaaa is not supplied.
*LOAD <name> aaaa (*L.)
Loads the named file. The file is loaded into memory starting at aaaa,
or at the file's start address if this is missing.
*DELETE <name> aaaa (*DE.)
Deletes the named file.
*GO aaaa
Executes the machine-code subroutine at aaaa.
*RUN <name> <string> (*R.)
Load and run the named file, using the start and execution address.
<string> is transferred to memory starting at 0140h with a terminating
CR, where it can be accessed by the user's program.
*EXEC <name> (*E.)
Executes the named text file as if it had been entered at the keyboard.
*SPOOL <name>
Outputs all data from keyboard first to the named file, and then to the
screen.
DOS responses and error messages:
Command?
The command is not recognised.
Syntax?
The paramters are illegal or incorrectly presented.
Name?
The filename is longer than seven characters.
File?
The file is not found.
Disc prot
The disk is write-protected.
File prot
The file has been locked.
Disc full
There is insufficient room on the disk to create the new file.
Full
There are already 31 files in the catalogue.
Disk error 08 (Clock error)
During a disk read operation a clock bit was missing.
Disk error 0A (Late DMA)
During a disk transfer the processor did not respond fast enough.
Probably due to a faulty disk controller card.
Disk error 0C (ID filed CRC error)
The cyclic redundancy check derived from the data read back differed
from that stored on the disk.
Disk error 0E (Data CRC error)
The cyclic redundancy check from the data read back differed from that
stored on the disk during a disk read.
Disk error 10 (Drive not ready)
During a transfer the disk stopped rotating. Often due to a badly
inserted disk.
Disk error 14 (Track 0 not found)
The controller failed to find track 0. Often due to an unformatted disk.
Disk error 18 (Sector not found)
The controller failed to find the required sector. Often due to a
corrupted or unformatted disk.
DOS uses the zero page addresses 9Ah-FDh, except A4h, CEh-D4h and D7h-E8h.
5.2 RAM
The emulated Acorn ATOM has 40 kB of Random Access Memory:
-0000h: Zero Block RAM (1 kB)
-0400h: Expansion RAM (7 kB)
-2000h: DOS Catalogue Buffer (0.5 kB)
-2200h: DOS Sequential File Buffers (1.5 kB)
-2800h: Floating Point Variable Space (0.25 kB)
-2900h: Text RAM (21.75 kB)
-8000h: Graphics RAM (6 kB)
-9800h: Expansion RAM (2 kB)
5.3 I/O-DEVICES
The 4 kB block at B000h is reserved for I/O-devices. The following devices
are implemented in the emulator:
-8255 Programmable Peripheral Interface Adapter (PPIA)
ù Port A at B000h: Output bits: Function:
7 - 4 Graphics mode
3 - 0 Keyboard row
ù Port B at B001h: Input bits: Function:
7 SHIFT keys (low when pressed)
6 CTRL key (low when pressed)
5 - 0 Keyboard column
ù Port C at B002h: Input bits: Function:
7 60 Hz sync signal (low during flyback)
6 REPT key (low when pressed)
5 Casette input (not implemented)
4 2.4 kHz input (not implemented)
Output bits: Function:
3 Intensity
2 Loudspeaker
1 Enable 2.4 kHz to casette output (n.i.)
0 Tape output (not implemented)
ù Port D at B003h: Input bits: Function:
7 SHIFT keys (low when pressed)
6 CTRL and REPT keys (low when pressed)
5 Casette input (not implemented)
4 2.4 kHz input (not implemented)
Output bits: Function:
3 - 1 Function select for bit 0:
000 - Tape output (not implemented)
001 - Enable 2.4 kHz to casette? (n.i.)
010 - Loudspeaker
011 - Intensity
0 Communication bit (see bits 3-1)
Note:
ù Port C, bit 3 actually selects between the two possible sets of four
colors. However, I have chosen to use only one colorset, which can be
altered freely as described in chapter 4.3, and to use Port C, bit 3
as an intensity selector for the "ForeGr" and "Color0" colors, because
that's how I've always seen it on my real ATOM with its green monitor!
If this bit is set (1), the amounts of red, green and blue of the
"ForeGr" and "Color0" colors are multiplied by 1.5.
ù Port D is NOT documented by Acorn. However, it is used in their ROMcode
to output the beep to the loudspeaker. Up to version 1.2 of the emulator
this "beep" routine was ROM-trapped and all other writes to this port
had no effect (e.g. UtilityKit by A&F).
Though implemented now, it is recommended to use the documented ports
only, i.e. ports A, B and C.
On a real ATOM, writing 1 into bit 7 (80h) results in crashing the
computer. In the emulator, writing to bits 7-4 has no effect.
-6522 Versatile Interface Adapter (VIA)
Register: Address: Name:
ù Data Register B B800h DB (partially implemented)
ù Data Register A B801h DA (implemented for printer)
ù Data Direction Register B B802h DDRB (partially implemented)
ù Data Direction Register A B803h DDRA (for reading DA only)
ù Timer 1 low counter, latch B804h T1CL
ù Timer 1 high counter B805h T1CH
ù Timer 1 low latch B806h T1LL
ù Timer 1 high latch B807h T1LH
ù Timer 2 low counter, latch B808h T2CL
ù Timer 2 high counter B809h T2CH
ù Shift Register B80Ah SR (not implemented)
ù Auxiliary Control Register B80Bh ACR (partially implemented)
ù Peripheral Control Register B80Ch PCR (lower nibble, partially)
ù Interrupt Flag Register B80Dh IFR (partially implemented)
ù Interrupt Enable Register B80Eh IER (partially implemented)
ù Data Register A B80Fh DA (reads/writes to B801h)
Notes:
ù DB and DDRB partially implemented means that only the polarity signal
on PB7, generated by Timer 1, is implemented.
ù Timer 2 pulse mode not implemented. Timer 2 only runs in one shot mode
and stands still in pulse mode.
ù DA is a full 8-bit output register to the printer, independent of the
value of DDRA. On a read, input bit(s) used as "printer busy" signal.
ù ACR only bits 7 - 5 implemented.
ù PCR only bits 3 - 0 implemented (and for printer interface only).
ù IFR only bits 7 - 5 implemented.
ù IER only bits 7 - 5 implemented.
In short: The emulator fully supports both independent 16-bit timers,
interrupts generated by these timers and an 8-bit printer
interface.
-8271 Floppy Disk Controller (FDC)
An 8271 FDC has been installed at memory address BA00h. On a real ATOM, the
FDC was positioned at 0A00h. Why Acorn ever chose this completely unlogical
address, will probably remain a secret forever. Of course, on a real ATOM
it could not be placed at BA00h, because the VIA took 1 kB (03F0h pseudo
addresses), but ANY address somewhere in the B-block would have been much
better than 0A00h! The DOS ROM has been adjusted for the FDC's new address.
The FDC consists of a number of communication ports:
Address Write Read
BA00h Command register Status register
BA01h Parameter register Result register
BA02h Reset register -
BA03h - -
BA04h Data register Data register
The emulator uses disk images (.DSK files), that contain one side of a disk
of standard disk filing system (DFS), namely 40 tracks of 10 sectors each
with 256 bytes per sector, in logical order.
Most of the possible 8271 commands are supported. All ATOM DOS commands are
supported. Further, it is possible to format disks as well. Please refer to
chapter 5.1 for information on the DOS-commands.
-BoxSwitch for (EP)ROM toolboxes at A000h
Bits 0-3 of this port at memory address BFFFh select which of maximum
sixteen boxes is active in the memory range A000h-AFFFh. By POKEing a value
into this port, the user can select a box manually. During emulation this
value can be altered by the emulator as well. If an unknown command is
encoutered, the next box will be scanned through and so on until the first
box is reached again or a command has been recognised. After a command has
been found in a certain box, that box remains active. This way, if a program
has been written using commands of a certain box, the emulator only needs to
select the box once; it then remains active and no time is lost for swapping
memory. See chapter 9 for information what could go wrong.
The zero page addresses 90h-99h are kept seperately per box. When another
box is selected, its "own" zp90h-99h are restored.
-Printer
It is possible to output data from the emulator directly to the printer,
using the ATOMs own ROM routine. But the emulator is even a bit better than
a real ATOM: The real ATOM only supports a 7-bit interface, the emulator
supports an 8-bit interface! See also chapter 5.3 for a description of the
VIA registers.
The original ATOM uses Data Registers A (DA) of the 6522 VIA to communicate
with the printer. In this 8-bit port, bit 7 is used as a status line (input),
while bits 6-0 act as output to the printer (The value 7Fh is written to the
Data Direction Register A (DDRA) at B803h). The emulator does the following:
When reading DA, the input bits, as selected in DDRA, show whether or not the
printer is out of paper. On write, all 8 bits of DA are sent to the printer.
In other words, writing to this register is independent of the value of DDRA.
Further, the emulator works according to the routine in the ATOMs ROM; When
on the Peripheral Control Register (PCR) at B80Ch low output is selected
(i.e. bits 3-0 have value 1100b), the character stored in DA is sent to the
printer. This happens once for every write to PCR.
For more information: The ATOM printer routine is located at FEFBh. Note
that CTRL-B (02h) switches on, and CTRL-C (03h) switches off output to the
printer. Also see chapter 2 for the IgnoreZpFEh parameter in the .INI file.
If you have the COMBOX and the P-CHARME installed, just type PLIST to print
the listing of your BASIC program.
-Mouse
On a real ATOM is was possible to connect a hardware mouse. The protocol and
I/O addresses for it have been defined by Kees van Oss, and I've taken the
opportunity to use the same I/O addresses for compatibility reasons.
The mouse interface consists of four I/O ports. They are:
Address Type Description
BFE0h RW Mouse x coordinate
00h - Most left coordinate
F8h - Most right coordinate
BFE1h RW Mouse y coordinate
FFh - Top line
47h - Bottom line
BFE2h R Mouse buttons
bit 0 = 0: Left button pressed
bit 1 = 0: Right button pressed
bit 2 = 0: Middle button pressed (if available)
BFE2h W Mouse properties
bit 7 : Mouse shown/hidden (0=on, 1=off)
bits 4-0 : Mouse cursor number (00h-1Fh)
Note that the last two ports have the same logical address. The mouse cursor
is maximum 8x8 pixels (as in "clear 4" pixels) in size. It has this size in
all graphic modes as well as in text mode. Its color is white.
The mouse is turned on by POKEing a value between 00h (0) and 1Fh (31) into
the mouse properties port at BFE2h. Thus, there are 32 different predefined
cursors. They cannot be altered.
The mouse is turned of by POKEing a value larger than or equal to 80h (128)
into the mouse properties port at BFE2h.
6. FILE TRANSFER
6.1 The AtomTape utility
The ATOMTAPE.EXE utility enables you to transfer files from an original
Acorn ATOM or from tape to the PC. However, a soundcard is necessary,
because the ATOMTAPE.EXE utility analyzes VOC-files.
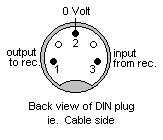
You must connect your ATOM or tape recorder to the "Line In" connector
on your soundcard, using line 2 as ground and line 1 as output signal.
(Line 3 is the input signal to the ATOM from the recorder).
See adjacent diagram.
The program can only evaluate named files; which are files, containing a
control block / header and a data block of 257 bytes (the last being a
checksum byte), the next control block, the next data block, etc.
About the tape speeds:
Every byte on tape is surrounded by a startbit (0) and a stopbit (1).
In between there are the 8 bits of the databyte. In 300 bps mode every
cleared bit (0) consists of four 1.2 kHz waves and every set bit (1)
consists of eight 2.4 kHz waves. In 1200 bps mode every cleared bit (0)
consists of one 1.2 kHz wave and every set bit (1) consists of two 2.4 kHz
waves. The stopbit (1) always has one extra 2.4 kHz wave.
After the VOC file has been recorded, start the ATOMTAPE.EXE utility.
Enter the VOC filename and whether it has been recorded at 300 bps or
1200 bps. The utility then checks whether the VOC file is of the right
format (8-bits, mono, 22050 Hz) and starts analyzing the data. If all goes
well the subsequent control blocks (headers) of the file are shown and
the data blocks are loaded.
If no errors occur, the file will be saved to the same name as the VOC
file, but with the .ATM extension.
The format for the .ATM files is as follows:
Offset Size Description
------ -------- -----------------------------------------------------------
0000h 16 BYTEs ATOM filename (if less than 16 BYTEs, rest is 00h bytes)
0010h WORD Start address for load
0012h WORD Execution address
0014h WORD Size of data in BYTEs
0016h Size Data
6.2 The AtomCom utility
Please refer to the file "AtomCom.Doc" for information.
7. COMPATIBILITY
CPU
-Complete 65C02 instruction set,
-Seven extra 65802 instructions,
-RES, IRQ and NMI serviced,
-80x87 co-processor support for fast floating point calculations.
The 65C02 has a number of advantages over the 6502:
ùThere are no illegal opcodes. Unused opcodes are handled as NOP's with
either no, one or two operands.
ùThe C, V and N flags are valid in decimal mode (As far as this is concerned
previous versions of the emulator already featured this 65C02 aspect).
ùThe JMP (addr) instruction no longer wraps around a page (This 6502 bug was
never implemented in previous versions of the emulator).
ùThe decimal mode flag is cleared whenever a RES, IRQ or NMI is serviced.
The 65C02 offers 27 new instructions and two new addressing modes. The
instructions are:
BRA - Branch always,
PHX - Push x-register onto stack,
PHY - Push y-register onto stack,
PLX - Pull x-register from stack,
PLY - Pull y-register from stack,
STZ - Store zero to memory,
TRB - Test and reset memory bits against accumulator,
TSB - Test and set memory bits against accumulator.
The two new addressing modes are:
Indirect, e.g. LDA (55h)
Absolute Indexed Indirect, e.g. JMP (1234h,x)
Furthermore, seven 65802 instructions have been added:
COP - Co-processor enable
JSR (addr,x) - Jump to subroutine, absolute indexed indirect,
TAS implied - Transfer accumulator to stack pointer,
TSA implied - Transfer stack pointer to accumulator,
TXY implied - Transfer x-register to y-register,
TYX implied - Transfer y-register to x-register,
SWA implied - Swap high and low order bytes of accumulator.
Because of the last instruction, one extra register has become available,
which can be exchanged with the accumulator using the SWA instruction.
Perhaps in later versions, more 65802 features, including 16 bit registers,
will be implemented.
The COP instruction (02h) is a little bit different from real 65802 CPUs.
In the emulator it is an implied instruction. It does not cause an
interrupt, but links with an 80x87 co-processor routine. This routine
contains several functions (selected through the accumulator). Parameters
can be passed through to and from the co-processor from any offset inside
the ATOM memory, held by the X- and Y-registers (X=lo-byte offset,
Y=hi-byte offset).
Further documentation is not yet made available, bacause implementation
and standardisation of these functions are still in progress.
VIDEO
-All graphic modes, colors user definable.
SOUND
-Supports sound through PC speaker and SoundBlaster or compatible.
I/O PORTS
-8255 PPIA keyboard/graphics ports,
-6522 VIA timers/timer interrupts, 8-bit printer interface,
-8271 FDC floppy disk controller,
-Hardware mouse I/O ports,
-BoxSwitch, automatically and manually,
-Read flip-flop (55h/AAh) for emulator detection at memory address BF7Fh.
COS
-ROM-trapped LOAD and SAVE routines,
-ROM-trapped FIN, FOUT, GET and PUT routines,
-*CAT ROM-trapped,
-Tape image files with directory,
-AtomTape.Exe utility reads original tapes from .VOC-files,
-AtomCom.Exe utility exchanges data between PC and ATOM.
DOS
-Disk image files,
-On screen disk LEDs.
DEVICES
-Output to printer,
-Hardware mouse support, including 32 predefined mousecursors.
8. VERSION HISTORY
Upgrade v1.0 --> v1.1:
On first sight nothing is new from version 1.0. However, emulator v1.1 runs
in VGA mode 12h in stead of 13h, because on some graphic adapters a stable
screen could not be achieved. I hope this solves the problem.
Upgrade v1.1 --> v1.2:
Again only some minor changes have been made:
-Data can be loaded in memory range A000h-AFFFh. Other ROM areas cannot be
overwritten anymore.
-A bugfix: The AND absolute command now also does I/O operations.
-Another bugfix: Sometimes files misteriously disappeared and reappeared or
could not be imported. Simply by resetting the internal error flag (used
for checking I/O operations by Turbo Pascal) prior to opening files, this
problem now seems to have disappeared.
-Yet another bugfix: Loading of the extension ROM, specified in the .INI
file didn't work. It should be OK now.
-Hotkeys changed.
Upgrade v1.2 --> v1.21:
-Partial implementation of undocumented PPIA port D at B003h.
-Optional disassembly of illegal opcodes in desktop monitor.
Upgrade v1.21 --> v1.22:
-Error in v1.21 fixed: Memory 0000h-9FFFh RAM and C000h-FFFFh protected
against overwriting by loading.
-On some computers the monitor would go into Stand-by mode as soon as the
emulator was started. I hope to have that problem fixed now.
Upgrade v1.22 --> v1.30:
-*CAT command ROM-trapped.
-Debugging options expanded. Up to four breakpoints can be set at a time.
Special keys (F4, F5, F6, F9, F10, F11, F12, Shift+F12, Alt+F12, Ctrl+F12)
can be used during debug mode also.
-Parallel memory boxes at A000h. Up to 8 EPROMs can be used at the same
time. Automatic smart-switching included. Manual switching through byte at
BFFFh. On-screen box information by pressing [F6].
-The FIN, FOUT, GET, BGET and FGET functions and the SGET, PUT, BPUT, FPUT
and SPUT statements have been implemented.
-MS-DOS shell available (temporarily go to MS-DOS).
-Output to printer implemented.
Upgrade v1.30 --> v1.31:
-Screen capture to .BMP file.
-Mouse support implemented.
-Floppy Disk Controller and DOS implemented.
-Disk screen in emulator desktop added.
-Maximum number of parallel toolboxes at A000h expanded to sixteen.
Upgrade v1.31 --> v1.32:
-Sound output through PC-speaker improved.
-65C02 emulation in stead of 6502.
-Seven extra 65802 instructions.
-Boot from disk-image in drive 0, by pressing [Alt] + [F12] simultaneously.
-Alternative Floating Point ROM with 80x87 co-processor support.
9. PROBLEM SOLVING
-Every time the emulator is executed, it will determine the speed of your
CPU. If this is not done correctly, you must set the value of "SpeedIndex"
in the .INI-file manually. It should be about the value of the CPU speed
of your PC (in MHz) for 486/Pentium machines.
Examples: On an AMD 486 DX-40 MHz, it should be approx. 39,
On an Intel 486 DX2-66 MHz, it should be approx. 65,
On a Pentium 120 MHz, it should be approx. 123.
On a Pentium 233 MHz, it should be approx. 236.
Note: The values mentioned above, apply to the emulator run under an MS-DOS
environment. If run under Windows, the emulator runs a little bit slower
(Automatic speed detection on a P120 results in a value of 123 if run under
MS-DOS, and it results in 121 if run under Win95).
-If you find that sometimes a few keys don't work (Shift, Alt, Ctrl etc.),
remember that you can toggle between the standard and the alternate
keyboard during emulation by pressing the [F4] key. You may have switched
to the alternate keyboard especially for a game, and forgotten to switch
back to the standard keyboard. On BREAK (F12) the standard keyboard is
selected automatically.
-If you run the emulator under Windows 95, it could sometimes happen that
you accidently press the Windows-key. When you return to the emulator the
screen is blanked. Nothing bad has happened, it just needs rebuilding,
which can be achieved by entering the emulator desktop and then resuming
emulation by pressing [Esc].
-It could happen that the ATOM crashes because of incompatibility of (EP)ROM
boxes. Suppose you'd enter the following commands:
GRMOD |