|
EXPANDING THE ATOM
OPENING THE
CASE
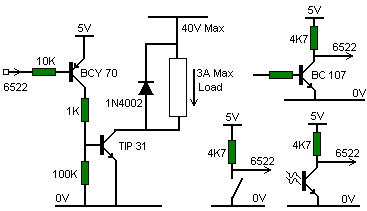
In order to add any of the ATOM extensions it is necessary to open the case. Unplug the ATOM power connector before taking the case apart. Under the case two screws are undone to remove the case bottom allowing access to the component side 2 of the circuit board. When it is necessary to solder in extra IC sockets the board is removed from the top of the case by undoing the screws at each corner of the board. The case is assembled as described in the Construction Procedure. LOWER TEXT SPACE EXTENSIONThe first extension usually required is more RAM for BASIC text space. The unexpanded ATOM has 1024 bytes (1Kbyte) of RAM provided by ICs 42 and 43 of which 512 bytes is the upper text space and 512 bytes is the video RAM. Every time the ATOM is powered up or reset it automatically checks to see if there is RAM in the lower text space and uses it for programs if pre-ent; otherwise it defaults to the upper text space. Each 1024 bytes of RAM is provided by two 2114-Ls and these must be added in pairs. Each pair of 2114-Ls will provide text space for about 64 lines of BASIC. To use the lower text space IC6 must be fitted; this is a 74LS138 in a 16 pin socket. ICs 10 to 19 provide for up to 5 Kbytes of space and they must be added in the order 10 and 11, 12 and 13, 14 and 15 etc. They are all 2114-L types and they require 18 pin sockets.The memory addresses contained by each pair of ICs are as follows: ICs 10 and 11 #2800 to #2BFF. ICs 12 and 13 #2C00 to #2FFF. ICs 14 and 15 #3000 to #33FF. ICs 16 and 17 #3400 to #37FF. ICs 18 and 19 #3800 to #3BFF. The # sign above indicates a hexadecimal number, #400 = 1024 bytes. Each 2114-L consumes around 35mA, so an ATOM with the full 5K of lower text space will require about 1125mA. VIDEO GRAPHICS EXTENSIONMore graphics RAM can be added increasing the screen resolution and allowing the use of the higher graphics modes. These modes are described in the book 'Atomic Theory and Practice' and they each require different amounts of video RAM provided by fitting pairs of 2114-Ls as follows: ICs 42 and 43 1024 bytes = 1 KByte. ICs 40 to 43 2048 bytes = 2 KByte. ICs 38 to 43 3072 bytes = 3 KByte. ICs 32 to 43 6144 bytes = 6 KByte. If only ICs 42 and 43 are in use the fitting of IC30 is optional. When IC30 is not present a wire link, LK1 on side 2, must be soldered on the circuit board. IC30 is a 74LS138 in a 16 pin socket and when it is fitted the wire link must be cut or removed, ICs 32 to 41 may then be added. The address locations provided by each pair of 2114-Ls are as follows: ICs 42 and 43 #8000 to #83FF. ICs 40 and 41 #8400 to #87FF. ICs 38 and 39 #8800 to #8BFF. ICs 36 and 37 #8C00 to #8FFF. ICs 34 and 35 #9000 to #93FF. ICs 32 and 33 #9400 to #97FF. Each 2114-L consumes about 35mA and so ATOMs with a 5 Kbyte lower text space and the 5 Kbyte video RAM extension (i.e. a total video RAM of 6 Kbytes) will require an 1500mA supply. FLOATING-POINT EXTENSIONA Read Only Memory containing the floating point, scientific functions, and colour routines may be added to the ATOM. This ROM goes in position IC21 on the circuit board using a 24 pin socket and the extra current consumption is negligible. VERSATILE INTERFACE ADAPTORThe VIA is a 6522 device requiring a 40 pin socket and fitted in the ICl position. It provides two input/output ports each having 8 data bits and 2 control lines. These lines appear on the 64 way connector, PL6, which is of the Vero 17-3704L type and the pin numbers are given on the circuit diagram. The base address of the VIA is #9800 and a description of how to operate it is in the book 'Atomic Theory and Practice'. It will be necessary to remove the circuit board from the case in order to fit the 64 way connector on side 2. Each interface pin of the 6522 can drive one standard TTL load, that is it can sink 1.6mA down to 0.4V and it can source 100uA into 2.4V. In input mode each pin present one standard TTL load. The circuits below show how the 6522 can drive a lamp or relay and how it can sense the state of a switch or transistor. Other circuits may be more suitable for some applications, these are only suggestions: In some applications the 6522 may need to interrupt the processor in which case the wire link LK2 is required which connects the interrupt line to IRQ (or NMI). The 6522 requires an extra 50mA from the power supply plus any current it sources into external loads. The ATOM can drive a parallel printer of the Centronics type when 6522 is fitted in position IC1 and a 74LS244 is in position IC50 64 way connector as not required as the printer connects to PL5 which, as a 26 way header, 3M type 3429-1302 A mating ribbon cable socket for this is part number 3399-6000. Note that one port of the 6522 is now used by the printer and no no longer available for user I/O. The printer connector pin numbers and signal names are shown on the circuit diagram and when flat ribbon cable is used the wires are in the right order for connection to the 25 way E connector usually used on printers BUS BUFFERSWhen the 64 way connector PL6 is fitted the standard Acorn bus appears on this connector. Using this extra memory or interface cards may be added ICs 2,3,4 and 5 must be fitted to the ATOM in order to use the ICs 2 and 3 are 81LS95s which buffer the address bus and IC4 is a DP8304 (equivalent to INS8208) which is a bi-directional buffer. IC5 is a 74LS30 which determines whether the address being accessed isinside the ATOM or on the other side of the buffer. The buffer, IC4, is only enabled for addresses outside the ATOM so that bus conflicts do not occur. The addresses for which the buffer is enabled are: #0400 to #27FF #3C00 to #7FFF #E000 to #EFFF If IC6 is not fitted addresses #2800 to #3BFF also enable the buffer and the lower text space as then outside the ATOM so that an external memory card may be used. EUROCARD EXTENSIONAny one of the Acorn Eurocards can be fitted inside the ATOM case and connected to PL7 which carries the Acorn bus in parallel with PL6. The bus buffers must be fitted in order to use PL7. OTHER EXTENSIONSPL8 is a 20 way plug to which other extension boards may be fitted via a 20 way ribbon socket Resident software for other extensions can be in the utilities ROM, IC24 Normally PL8 is fitted to side 1 of the circuit board and its pin connections are as follows: LK3 is made in order to connect IRQ from PLS to the 6502. NB400 is an active low enable signal for the address range #B400 to #B7FF and it comes from IC49 pin 5. 
|