|
CONSTRUCTION PROCEDURE
BEFORE YOU START
Carefully unpack the ATOM kit and check that all the component parts are present. ard that none are damaged. In case of supply difficulties substitute components may be supplied; for instance 100nF capacitors may replace 47nF parts. For capacitors note that values may be expressed in two ways: O.1uF = 100nF 10nF = 10000pF 1nF = 1000pF O.1nF = 100pF etc. Capacitors supplied with Acorn products are usually identified by a three digit number, the first two digits being the first two digits of the value followed by a third digit giving the number of zeros. For example:
SOLDERING TECHNIQUE
Some of the integrated circuits used in the ATOM employ MOS technology and they can be damaged by static electricity. As a general rule if there is no noticeable static charge in the area and no nylon clothes or carpets are present all will be well. An earthed soldering iron should be used when working on a board carrying MOS circuits. The ATOM printed circuit board is double sided, through-hole plated glass fibre. A layer of green solder resist ensures that accidental solder splashes do not short out tracks and a white component legend clearly indicates where each part goes. Examine the board for faults or damage before commencing work. Do not solder through holes on the board connecting tracks from one side to the other without a component in them as they may be damaged; in any case these holes should have solder resist over them. PARTS LIST Parts supplied with the basic ATOM kit are as follow
All of these resistors may be 0.25 or 0.33 Watt components with a tolerance of 5 or 10%. The electrolytic capacitors (marked *) may be replaced by any value in the range 10 to 47uF. They should be rated at 10 volts or greater. Other parts supplied with the basic ATOM kit include: Injection Moulded Case. Printed Circuit Board 202,000 Four short and two long self-tapping screws. Self-adhesive key surround. Four stick-on feet. Key Assembly and fixing screws. Xl 3.58 MHz crystal. X2 4.00 MHz crystal. Ll 1 mH choke. SK1 UHF Modulator. SK2 7 pin DIN socket. SK3 Power socket. Q1,2 2 NPN transistors type BC107 or 184,237,239 Loudspeaker,adhesive pad and wire. Loudspeaker Baffle. Nut and screw for Regulator. Heat sink. 52 sockets for the complete set of Integrated Circuits as follows. 1 off 8 pin 7 off 14 pin 6 off 16 pin 24 off 18 pin 7 off 20 pin 3 off 24 pin 4 off 40 pin The remainder of the components required for the extensions are listed in the appropriate sections later on. IMPORTANT NOTEThe ATOM printed circuit board is double sided with the sides being identified by the legends "SIDE 1" and "SIDE 2". All the IC sockets, the connectors PL/SK 1 to 7 and the passive components are mounted on side 2 and they are therefore soldered on side 1. PL 8 and the keyboard are mounted on side 1 and soldered on side 2. The component layout diagram is a view of the circuit board from side 2 and it will assist in identifying components whose legend is obscured on the board itself. Read through the following instructions and then assemble the ATOM step by step. LINKSSeveral links may be fitted to the PCB to cater for different requirements. None of the links need to be fitted for a minimal-configuration ATOM powered by an ATOM mains adaptor.
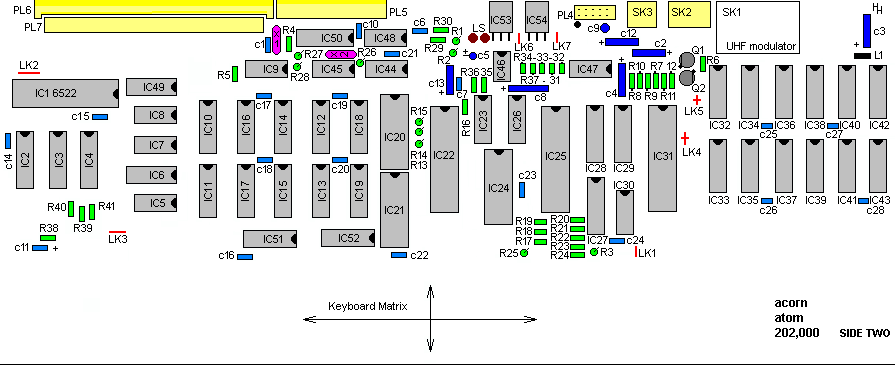
The sockets supplied with the ATOM are fitted to the circuit board in the locations for the ICs provided. Sockets are mounted on side 2 of the board and they are then soldered on side 1. Fit the sockets the right way round with pin 1 in the position identified on the circuit board as shown:
Pin 1 of the socket is identified by a chamfer or cut out as shown. Fit the sockets one at a time and ensure that they are pressed fully down with no pins bent under them. First solder two diagonally opposite pins and check that the socket is correctly fitted before soldering the remainder of the pins. There is no need to cut off the excess of the pins on side 1 of the board. PASSIVE COMPONENTSThe passive components, that is the resistors and capacitors, are fitted next. Each resistor and capacitor position is marked on side 2 of the circuit board with a legend ie R7 or C12 and a line showing the two holes through which the leads pass. Identify each component from the parts list and bend its leads as shown before mounting it on side 2 of the board with the leads poking through to side 1. Solder the leads on side 1 and cut off any excess. The electrolytic capacitors are polarised and the positive ends of them must be towards the + sign on the board. Some electrolytics have an arrow or a band round them indicatinq the negative end and this must point or be away from the + sign. The 1mH choke is fitted in position Ll.
The ATOM may already have its keyboard fitted; if not then proceed as follows. Carefully remove the key assembly from its protective backing and lay it key-top side down with the leads sticking upwards. Check that all of the leads are straight and correct any that are bent over. Taking great care not to bend any of the leads position the circuit board over the key assembly such that the keys will be on side 1 of the board, that is the side opposite to the ICs and passives etc .Lower the circuit board over the key leads so that they poke through the holes in the circuit board and then move the two parts until the fixing screw holes are aligned. Ensure that ALL of the key leads poke through the circuit board. Then fix the keyboard to the PCB using six self-tappinq screws with insulating washers to ensure that they do not short out the PCB tracks. Solder each key lead on to the side of the large plated through-holes in the circuit board pushing the leads over to the side of the hole where necessary. Do NOT fill the holes with solder; when the solder cools it may contract and break the plated-through connection. Do not allow blobs of solder to fall through the holes into the keys. CONNECTORSThe power jack socket and the D.I.N. socket for the tape recorder are mounted on side 2 of the board and soldered on side 1. The power socket, SK3, has two lugs which are soldered into the board and the third connection is made with a short piece of wire, such as an offcut from a resistor. SK2 is a 7 pin socket which is held by a spring clip through two holes near the front of the board and by the seven soldered leads. Plugs PL4, PL5, PL6, PL7, and PL8 are not required on the minimum configuration ATOM. LOUDSPEAKERFix the loudspeaker to side 1 of the board to the right of the keyboard using a double-sided sticky pad. Connect it to the two marked holes beside C5 using twin-cored wire and press the baffle over the loudspeaker. MODULATORThis is mounted on side 2 with the two metal securing lugs through the board and soldered on side 1. The +5 volt and input signal wires are soldered into the two holes indicated on the board beside the modulator. VOLTAGE REGULATOR
Bend the leads taking care not to break them off as they enter the body of the device. Fit the second regulator in an identical manner, and then slide the heatsink between the regulators and the PCB. Screw down the regulatcrs with the nuts and screws supplied, taking care that they do not short out the adjacent tracks on the PCB, and then solder the leads on side 1 of the board. Cut off any excess lead. CRYSTALSThe two crystals for the ATOM stand upright about a quarter of an inch above side 2 of the board. If necessary bend the leads so that they pass through the holes at positions X1 (3.58M) and X2 (4.00M). Take care not to break off the lead where it enters the crystal and check that the metal can does not short to any adjacent components. TRANSISTORSTwo transistors, Ql and Q2, are fitted taking care that they are oriented as on the circuit board legend. INTEGRATED CIRCUITSThese may now be fitted in their sockets. Pin 1 of each device is identified by either a semi-circle or a dot as shown:
Devices which are liable to damage by static electricity will be supplied in anti-static packing and they should not be removed from this until required for insertion into their sockets. Identify each device from the parts list and plug it into the appropriate socket. If the pins on the IC are splayed out, press them all in together as shown until the device fits easily into the socket:
Take great care that no IC pins get bent under the IC when inserting and ensure that all of the ICs are correctly aligned with pin 1 in the right place. If available, more 2114s may be fitted in positions IC 10 to 19 and 32 to 41 as described in the extensions sections. FITTING THE CASEAfter checking that all soldering on side 1 is satisfactory the circuit board may be fitted in the case. If any extension kits are available they may be fitted as described in the relevant sections of this manual. Take the top of the case, that is the piece with the cut-out for the key-board, and lay it down with the pillars and screw holes facing upwards. The assembled circuit board should be placed over the case with the component side 2 upwards. Screw, but do not tighten, four self-tapping screws into the four corner mounting pillars in the case thus lightly holding the board in the case. Move the board in the case so that all the keys clear the edges of the cut-out in the top and then tighten up the four screws The bottom of the case is next placed over the circuit board and moved so that it lines up with the top. If the connectors do not then appear centrally in the cut-outs on the rear of the case bottom some adjustment of the position of the board in the top of the case may be required. Finally put two long self-tapping screws into the holes in the case bottom and fix the bottom to the top by tightening them up. Four self adhesive feet may be stuck to the bottom of the case and the surround for the keys is stuck to the top of case when its backing is peeled off revealing a layer of adhesive. T.V./VIDEO MONITORThe ATOM screen display may be on a domestic television or a video monitor. To connect to a domestic television use the phono to co-axial connecting lead supplied. The phono plug goes into SK1 (the modulator output) and the other end of the lead goes to the aerial socket of the television. If the television has a graduated tuning scale, set it to channel 36. A 1 volt into 75 ohm composite video signal for monitors is available on pin 9 of PL4 with a corresponding 0 volt return on pin 10. These are indicated on the following diagram.
The normal ATOM produces a monochrome picture, even if a colour television or monitor is used. The PAL encoder circuit board can be fitted inside the case to give a colour picture. POWER SUPPLYThe basic ATOM requires a power source of 8 volts DC which is regulated on the circuit board by IC53 and IC54 to produce a stabilised 5 volts. The ATOM high-efficiency mains adaptor provides such a source, and it is fitted with a jack plug for connecting to the ATOM. The high-efficiency mains adapter is capable of delivering up to 1600 mA and powering a fully-expanded ATOM using the low-power memory that is currently supplied. This current is obtained as follows:
Note that ATOMs supplied before October 1980 used normal-power RAM memory devices which have a current consumption of 100 mA per K; the total current consumption of a fully-expanded ATOM usinq normal-power memory is therefore too great for the ATOM mains adapter. REGULATED SUPPLYThe ATOM may alternatively be powered by a 5v regulated supply. In this case two links, LK6 and LK7, should be fitted to the board. The power distribution on the board is normally separated into two sections; one for each regulator. These sections should be joined together by fitting a link at LK6 on the circuit board. The regulators should be bypassed by fitting link LK7 on the board. The power socket, SK3, is now for a stabilised 5 volt input and the mains adaptor must NOT be plugged into it. This part should be marked clearly on a label attached near the power socket on the back of the ATOM. A circuit far providing a stabilised 5 volts at up to 3000 mA capable of powering a fully expanded ATOM together with any Acorn eurocard is given here:
When the T.V. or monitor is connected the power connector may be inserted into SK3. The ATOM is now on. Press the break key to reset the ATOM; the screen should now show: ACORN ATOM > At this stage if a television is being used it should be tuned until a display is found. Both monitors and televisions may now require adjustment of the vertical hold control. After further fine tuning in the case of the television to obtain a sharp display, the brilliance control should be set so that the background is slightly grey rather than black. The contrast control is then adjusted to make the characters as bright as required. If no display is found check that all the connections are correct and in the case of ATOMs assembled from kits check that the construction procedure has been followed correctly. when the display on the screen is correct refer to the book 'Atomic Theory and Practice' for details of how to program the ATOM. TAPE RECORDERPrograms or data may be stored on standard audio tape using a domestic tape or cassette recorder. The ATOM contains a Computer Users Tape Standard (CUTS) interface, and connection to the recorder is by a 3 pin D.I.N. plug in SK2. Pin 1 is the output to the recorder, pin 2 is the 0 volt or common connection, and pin 3 is the input to the ATOM from the recorder. These are shown in the diagram:
Only a 3 pin lead should be used as the other 4 pins of SK2 carry digital outputs which may damage recorders with 5 or 7 pin connectors. Both recording and playback on the ATOM are crystal controlled and, except on very cheap recorders whose speed may vary, no trouble should be experienced when transferring tapes from one ATOM to another. The use of recorders with an input and output dedicated to connection to an external amplifier is recommended as opposed to those with only microphone and earpiece facilities; however good results should be obtained with most machines. The setting up of the recorder using a test program is described on page 8 of the book 'Atomic Theory and Practice'. Should correct results not be obtained the signal levels may require adjustment. Both the input and output are normally set to a level of 300 mV R.M.S. The output can be adjusted by changinq the value of R29 so that the recorder's VU meter reads 70% on recording (20% = -3dB). The gain of the input amplifier on the ATOM may be changed by altering R34; hi-fi cassette decks are generally more sensitive and often require that this resistor is changed from 47K to 220K. OUTPUT PORTSPins 4,5,6 and 7 of SK2 carry bits 1,2,0 and 3 respectively of port C of the INS8255 (address B002). These are normally set to output mode and they will drive a standard TTL load. Bits 0 and 1 also drive the tape interface, bit 2 bleeps the loudspeaker, and bit 3 selects between the two possible sets of four colours. Refer to the book Atomic Theory and Practice' for further details. 
| |||||||||||||||||||||||||||||||||||||||||||||||||||||||||||||||||||||||||||||||||||||||||||||||||||||||||||||||||||||||||||||||||||||||||||||||||||||||||||||||||||||||||||||||||||||||||||||||||||||||||||||||||||||||||||||||||||||||||||||||||||||||||||||||||||||||